· Guides · 10 min read
How to create a beautiful, functional Pricing Slider with Tailwind CSS and Alpine.js
A detailed guide on building a pricing slider using Tailwind CSS and Alpine.js, with support for non-linear scaling, multiple currencies and custom price logic
We recently revamped our marketing site, and added a new pricing page to make it easy to understand how our usage based pricing works.
Making the actual slider is trickier than you might initially think, and in this blog post, we’ll walk through how we created the pricing slider using Alpine.js and Tailwind CSS.
What does it do?
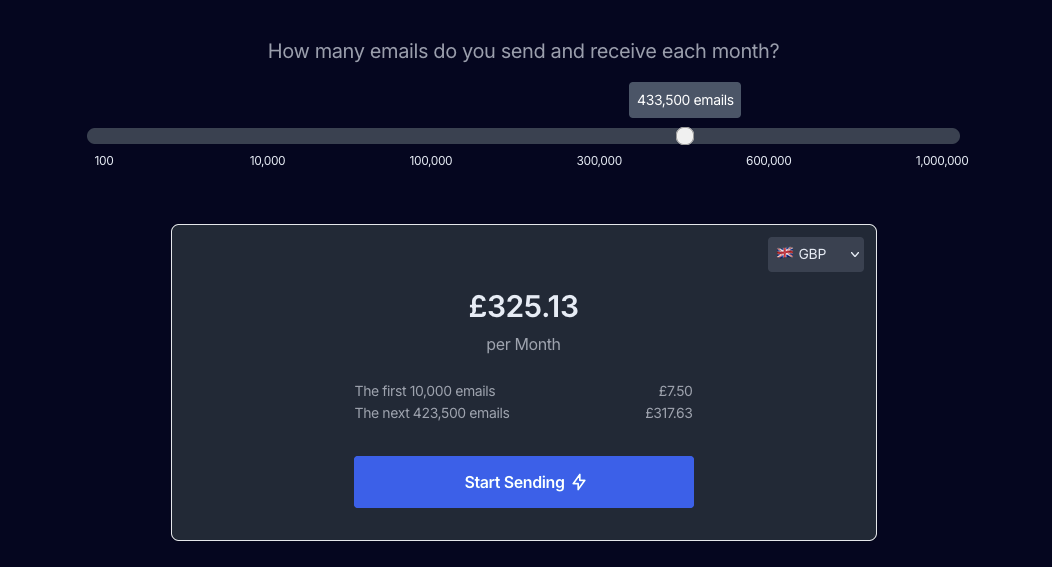
The slider allows users to select a monthly volume (email in our case, but it could be anything). Based on this selection, the price dynamically updates, showing both a base cost and an incremental charge for additional emails. You could apply this to any similar usage based pricing situation for your product. We’ll also include:
- A non-linear scaling system where different ranges of emails have varying costs
- Real time price and currency retrieval, via Paddle
- A tooltip to display the exact email count corresponding to the slider position
- Support for calculating the actual price you’ll pay each month split into base price plus incremental price
Couldn’t you just use a simple HTML input slider?
Well, we do, but it needs a lot of adjustments to make it look and feel good, and we need to implement a non-linear scale to support smaller senders (under 10,000) and larger senders (1 million +).
A non-linear scale means that equal increments on the slider don’t correspond to equal changes in the underlying value (in this case, email volume). Instead of each ‘click’ on the slider adding a fixed number of emails, the rate of increase changes.
In our example, moving the slider from 0-200 results in a smaller email range increase than moving it from 800-1000. This allows us to represent a very wide range of values (100 to 1,000,000 emails) within a manageable slider space, providing finer control over the most commonly selected ranges while still allowing access to extreme values – effectively ‘compressing’ or ‘expanding’ certain sections of the scale.
Step 1: Basic HTML Slider
Let’s start with just the basic HTML for the slider itself. We’ll include Tailwind classes for styling, and because we know we’ll need to update the UI in a couple of places (the pricing box below and tooltips), we’ve added in a placeholder for Alpine.js to give us a consistent pattern for handling UI changes in JS.
<div x-data="emailPricing()" x-init="initSlider">  <!-- the slider is a simple range of points from 0-100, with attributes that link it JS functions via alpine.js -->  <div class="flex flex-col items-center justify-center p-4 mb-10 mt-10 w-full md:w-3/4 mx-auto">    <input      id="price-slider"      type="range"      min="0"      max="1000"      x-model="sliderValue"      @input="updatePricing"      class="w-4/5 h-4 min-h-6 sm:min-h-4 bg-gray-200 py-2 rounded-lg appearance-none cursor-pointer dark:bg-gray-700"    />
    <!-- Our labels, note the scale is not linear -->    <div class="w-4/5 flex justify-between text-xs ml-4 mt-2">      <span>100</span>      <span>10,000</span>      <span>100,000</span>      <span>300,000</span>      <span>600,000</span>      <span>1,000,000</span>    </div>  </div>
  <!-- Price Box -->  <div class="flex flex-col md:flex-row gap-0 lg:mx-40">    <div class="w-full sm:w-2/3 mx-auto">      <div class="border rounded-lg shadow dark:bg-gray-800 mx-10 mb-10 px-3 pt-3">        <span x-text="totalPriceFormatted" class="font-semibold text-3xl text-center block mb-2"></span>        <div class="text-gray-500 dark:text-gray-400 text-center">per Month</div>      </div>    </div>  </div></div>
<!-- placeholder script for the alpine logic --><script>  import Alpine from 'alpinejs';
  document.addEventListener('alpine:init', () => {    Alpine.data('emailPricing', emailPricing);  });
function emailPricing() { return { sliderValue: 200, totalPrice: 0, // Placeholder for now updatePricing() { // We'll add logic here later console.log('Slider updated:', this.sliderValue); }, }; }</script>- We have a
divwithx-data="emailPricing()". This initializes our Alpine component. - The
<input type="range">is the slider itself.x-model="sliderValue"binds the slider’s value to thesliderValueproperty in our Alpine data.@input="updatePricing"calls theupdatePricingfunction whenever the slider value changes.
- We have a basic price display area with
x-text="totalPriceFormatted". Currently, it will just show “0”. - The JavaScript initializes an Alpine component called
emailPricing, which has asliderValueand an emptyupdatePricingfunction for now.
Step 2: Non-Linear Scaling
Now we add the logic to map the slider value (0-1000) to email counts, with different ranges. This is where we start using Alpine with the updatePricing function and new helper function. This allows the slider to scale in a non-linear fashion and gives us control over the ranges.
When we update this.emailsSent from within the emailPricing function, Alpine knows it’s bound to the Input slider and pricing box from our HTML, which will mean the slider will be updated with the new value.
<div x-data="emailPricing()" x-init="initSlider">  <!-- ... (rest of HTML from Step 1) -->
  <script>    import Alpine from 'alpinejs';
    document.addEventListener('alpine:init', () => {      Alpine.data('emailPricing', emailPricing);    });
    function emailPricing() {      return {        sliderValue: 200,        emailsSent: 10000, // Initial value        totalPrice: 0,
        updatePricing() {          this.emailsSent = this.calculateEmailsFromScale(this.sliderValue);        },
calculateEmailsFromScale(value) { if (value === 0) return 100; if (value <= 200) return 100 + ((10000 - 100) / 200) * value; if (value <= 400) return 10000 + ((100000 - 10000) / 200) * (value - 200); if (value <= 600) return 100000 + ((300000 - 100000) / 200) * (value - 400); if (value <= 800) return 300000 + ((600000 - 300000) / 200) * (value - 600); if (value <= 999) return 600000 + ((1000000 - 600000) / 200) * (value - 800); return 1000000; }, }; } </script></div>- We added a
calculateEmailsFromScalefunction that takes the slider value and returns a corresponding email count based on the ranges you provided. This is where the non-linear scaling happens. - Inside
updatePricing, we now callcalculateEmailsFromScaleto update theemailsSentproperty whenever the slider changes.
Step 3: Pricing Logic
Let’s add our pricing logic. We’ll have a fixed price for the first 10,000 emails and then a price per thousand after that.
<div x-data="emailPricing()" x-init="initSlider">  <!-- ... (rest of HTML from Step 2) -->
  <script>    import Alpine from 'alpinejs';
    document.addEventListener('alpine:init', () => {      Alpine.data('emailPricing', emailPricing);    });
    function emailPricing() {      return {        sliderValue: 200,        emailsSent: 10000,        basePrice: 12, // Fixed price for the first 10k emails        pricePerThousand: 1.0, // Price per 1000 emails after that
        totalPrice: 0,
        updatePricing() {          this.emailsSent = this.calculateEmailsFromScale(this.sliderValue);          this.calculateTotalPrice();        },
        calculateTotalPrice() {          if (this.emailsSent <= 10000) {            this.totalPrice = this.basePrice;          } else {            this.totalPrice = this.basePrice + (this.pricePerThousand * (this.emailsSent - 10000)) / 1000;          }        },
// ... (calculateEmailsFromScale function from Step 2) }; } </script></div>- We added
basePriceandpricePerThousandproperties. - Inside
updatePricing, we now call a newcalculateTotalPricefunction after updatingemailsSent. - The
calculateTotalPricefunction calculates the total price based on the number of emails sent, using the base price and per-thousand price.
Step 4: Formatting Currency & Adding Tooltip
Now we format the currency and add a tooltip to show the email count as you move the slider. This is where Intl.NumberFormat function comes in handy, which is supported in all modern browsers:
<div x-data="emailPricing()" x-init="initSlider">  <!-- ... (HTML from Step 3, including the slider input) -->  <div    class="text-white text-sm absolute bg-slate-600 p-2 rounded -translate-x-2/4 min-h-10 sm:min-h-4"    x-show="showTooltip"    x-bind:style="{ left: tooltipPosition.left + 'px', top: tooltipPosition.top + 'px' }"    id="tooltip"  >    <span x-text="emailsFormatted"></span> emails  </div>
  <!-- ... (rest of HTML from Step 3) -->
  <script>    import Alpine from 'alpinejs';
    document.addEventListener('alpine:init', () => {      Alpine.data('emailPricing', emailPricing);    });
    function emailPricing() {      return {        // ... (previous properties and functions)
        showTooltip: true,        tooltipPosition: { left: 0, top: 0 },
        get emailsFormatted() {          return new Intl.NumberFormat('en-US', { // You can change the locale here            minimumFractionDigits: 0,            maximumFractionDigits: 0,          }).format(this.emailsSent);        },
        get totalPriceFormatted() {          return this.formatCurrency(this.totalPrice, 'USD'); // Default to USD        },
        formatCurrency(amount, region) {          try {            const formatter = new Intl.NumberFormat(region, {              style: 'currency',              currency: countryToCurrency[region] || 'USD', // See https://github.com/mailpace/landing/blob/main/src/components/widgets/PriceSlider.astro for the implementation of countryToCurrency            });            return formatter.format(amount);          } catch (error) {            console.error(`Error formatting currency for region ${region}:`, error);            return amount.toString();          }        },
        positionTooltip() {          const slider = document.getElementById('price-slider') as HTMLInputElement;          const tooltip = document.getElementById('tooltip');          if (!slider || !tooltip) return;          const sliderRect = slider.getBoundingClientRect();          const tooltipRect = tooltip.getBoundingClientRect();          const sliderThumbWidth = 20; // approximate width of the slider thumb          const maxSliderValue = parseInt(slider.max);
          const left =            sliderRect.left +            (sliderRect.width - sliderThumbWidth) * (this.sliderValue / maxSliderValue) +            sliderThumbWidth / 2;          this.tooltipPosition.left = left;          this.tooltipPosition.top = sliderRect.top + window.scrollY - tooltipRect.height - 10;        },
// ... (other functions from Step 3) }; } </script></div>- We added
showTooltipandtooltipPositionproperties to control the visibility and position of the tooltip. - The
emailsFormattedgetter usesIntl.NumberFormatto format the email count with commas for readability. You can change the locale ('en-US'in this example) to suit your needs. - The
totalPriceFormattedgetter calls theformatCurrencyfunction to format the total price as currency. - The
formatCurrencyfunction usesIntl.NumberFormatwith the'currency'style and specified currency code. Error handling is included in case the locale or currency isn’t supported. - The
positionTooltipfunction calculates the position of the tooltip based on the slider’s position, ensuring it stays centered above the thumb.
Step 5: Currency Selection & Dynamic Pricing (via Paddle API)
Finally, let’s add a currency selection dropdown and integrate with Paddle to fetch dynamic pricing based on the selected region. This uses the paddle API to retrieve the latest price of our products in the currency the user wants to see, by selecting the currency from the top right. Paddle can even infer the location of the user to guess their currency:
<div x-data="emailPricing()" x-init="initSlider">  <!-- ... (Previous HTML) -->
  <div class="flex flex-col md:flex-row gap-0 lg:mx-40">    <!-- Price Box -->    <div class="w-full sm:w-2/3 mx-auto">      <div class="border rounded-lg shadow dark:bg-gray-800 mx-10 mb-10 px-3 pt-3">        <div class="text-right mb-4">          <select x-model="custom_region" @change="initSlider" class="rounded p-2 text-sm bg-white dark:bg-gray-700">            <option value="">Currency</option>            <option value="US">🇺🇸 USD</option>            <option value="GB">🇬🇧 GBP</option>            <option value="FR">🇫🇷 EUR</option>            <option value="JP">🇯🇵 JPY</option>            <option value="CN">🇨🇳 CNY</option>            <option value="IN">🇮🇳 INR</option>            <option value="CA">🇨🇦 CAD</option>            <option value="AU">🇦🇺 AUD</option>            <option value="CH">🇨🇭 CHF</option>          </select>        </div>        <span x-text="totalPriceFormatted" class="font-semibold text-3xl text-center block mb-2"></span>        <div class="text-gray-500 dark:text-gray-400 text-center">per Month</div>        <!-- ... (rest of the price box HTML) -->      </div>    </div>  </div>
  <!-- ... (Previous JavaScript) -->
  <script>    import Alpine from 'alpinejs';
    document.addEventListener('alpine:init', () => {      Alpine.data('emailPricing', emailPricing);    });
    function emailPricing() {      return {        // ... (previous properties and functions)
        region: 'US', // Paddle response always update this        custom_region: null, // Users can set this if they want to override the region
        basePrice: 12,        increments: 0,        pricePerThousand: 1.0,
        // ... (other getters and functions)
        async initSlider() {          this.positionTooltip();
          const basePricePlan = 687241;          const incrementalPricePlan = 687246;
          const country = this.custom_region;          const productIds = `${basePricePlan}, ${incrementalPricePlan}`;          let url = `https://checkout.paddle.com/api/2.0/prices?product_ids=${encodeURIComponent(productIds)}`;
          if (country) {            url += `&customer_country=${country}`;          }
try { const response = await fetchJsonp(url); // See implementation const json = await (response as Response).json(); this.basePrice = json.response.products[0].price.net; this.pricePerThousand = json.response.products[1].price.net; this.region = json.response.customer_country; } catch (error) { console.error(error); } }, }; } </script></div>- We added a
<select>element withx-model="custom_region"to allow the user to select their currency region. The@changeevent calls theinitSliderfunction whenever the selection changes, triggering a price update. - The
initSliderfunction now fetches pricing data from the Paddle API based on the selected country. You’ll need to replace with your actual Paddle product IDs for the base price and incremental price plans, respectively. - The fetched prices are then assigned to
this.basePriceandthis.pricePerThousand, updating the displayed pricing dynamically. The region is also updated to ensure correct currency formatting.
Recap
We start with simple HTML and add Alpine.js for reactivity, and use vanilla JS for everything else.
- Alpine.js for Reactivity: Alpine.js makes it incredibly easy to add reactivity to your HTML without writing complex JavaScript code.
- Tailwind CSS for Styling: Tailwind CSS provides a utility-first approach to styling, allowing you to quickly build beautiful and responsive UIs.
- Non-Linear Slider Logic: The
calculateEmailsFromScalefunction implements the non-linear scaling logic for the slider, mapping slider values to email counts with different ranges. - Currency Formatting: The
Intl.NumberFormatAPI is a powerful tool for formatting numbers and currencies according to locale-specific rules. - Dynamic Pricing Integration: Integrating with an external pricing service like Paddle allows you to offer dynamic pricing based on factors such as region and currency.
You can see the full source code for the actual slider we have here, which is implemented in Astro:
github.com/mailpace/landing/blob/main/src/components/widgets/PriceSlider.astro
Happy Hacking!